When it comes to running a service-based business online, scheduling appointments with prospects and clients is critical. The downside of that, of course, is that it takes a lot of time to manage appointments and event bookings if you do it on your own.
With WordPress, however, there are a bunch of booking plugins that’ll get the job done. Put one of them in place and you can kiss many of those tedious appointment management tasks goodbye.
But all this is contingent on using the right WordPress booking plugin.
Today, I’m going to introduce you to the Amelia appointments and events WordPress booking plugin. But rather than show you how to install and use the plugin (which is very easy), I want to spend this time showing you how to design an effective booking system using it.
How To Book More Appointments And Events With Amelia
There are many kinds of clients that would benefit from a booking system:
- Salons, spas, fitness centers with services or classes at specific times;
- Service providers that work by appointment only (e.g. mechanics, plumbers, etc.);
- Real estate agents that host open houses or schedule property walk-throughs;
- Companies that put out webinars, virtual classes and so on;
- Freelancers and small businesses (like yours) that use discovery calls to vet prospects.
Now, they could use a third-party reservation system, but they’re often costly and difficult to manage. Not to mention the fact that some of these systems aggregate competitor listings. This might make it more convenient for the user to sift through a number of options at once, but this kind of booking system is just begging to pull prospective customers’ attention away from you.
By building a booking system right into your client’s website, you can avoid all of these possible issues. What’s more, you can automate the tedious tasks they would have resorted to doing on their own without a proper booking system option. For instance:
- Capturing prospects’ correct contact information.
- Figuring out a day and time that works best for both parties.
- Managing reschedules and cancellations.
- And more.
“
That said, there’s more to creating a WordPress booking system than just activating a plugin and embedding a shortcode. To help your clients effortlessly capture more appointments and events with the Amelia booking plugin, you’ll need to do the following:
1. ADD SEARCH AND FILTER ELEMENTS TO REDUCE DECISION FATIGUE
This won’t be the case for every booking system, but for businesses that offer a variety of options, appointments, service providers and so on, reducing decision fatigue is very important at this stage.
Take, for instance, a spa or salon website:

Many times, these kinds of businesses have a multitude of services (or on-site events) they offer. You could let your visitors click on “Book Appointment” or “Book Event” and sort through every service offering and provider on their own. Or you could improve the process by adding a search bar to your booking widget like this:
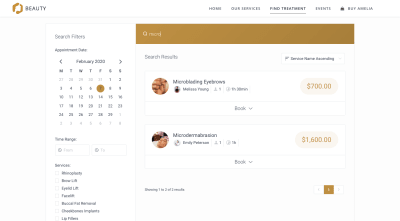
The sidebar filters also help — especially if customers aren’t necessarily sure what service they need or what it’s called. The pre-populated options make it easier to make those on-the-spot decisions.
In this example, the spa allows customers to filter services by:
- Appointment Date,
- Time Range,
- Services (which are all visible and multiple options can be selected),
- Employees.

This is a great example of how you can decrease decision fatigue with just a few design tweaks and help users book appointments more confidently and quickly.
2. SHORTEN THE SIGNUP AND SALES PROCESS
Think about the use case for your own business (as well as services providers like yourself).
Let’s say you want to set up an appointment scheduler for web design discovery calls. Wouldn’t it be useful to allow prospects to upload files when booking their appointments? They’d be able to share important documents like their style guide, logo and even their content before the appointment takes place.
As for how you build this into the booking widget, it’s fairly straightforward with your WordPress appointment plugin.
By default, Amelia allows you to control essential details about your “Events” and “Services”:
- Name of the event,
- Date and time options,
- Recurring schedule,
- Booking time period,
- Staff available,
- And so on.
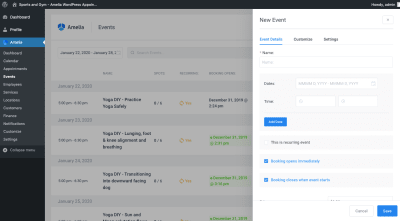
To allow prospects to upload files, you’ll need to go to the “Customize” tab and create a custom field for it:

Click “Add Custom Field” and you’ll see an option for “Attachment”:

All you need to do is give the new Attachment field a label (so people know what to upload) and then add it to any service or event you want it to appear in the booking widget for:

On the front end of the site, the new Attachment field will look like this:

It’s intuitive in design and, so long as you label it well, your users should find this additional field (required or not) one they want to take advantage of — especially if it means less work later.
For your own purposes, think about how great it would be to have a form like this in your appointment scheduler.
This would allow you to come fully prepared to the meeting rather than have to devise a rough plan on the spot. It would also shorten the lifecycle of your projects as you wouldn’t have to sit around waiting for clients to deliver essential documentation and content. (This would also be useful for people like healthcare practitioners or lawyers who need special waivers before they can take on new patients or clients.)
Plus, prospects that are this prepared in the initial booking stage are the kind of clients you want to be working with, so think of this feature as another way to vet your prospects (and help your clients do the same).
3. MAKE THE BOOKING WIDGET AS EFFECTIVE AS A PERSONAL ASSISTANT
Even if your clients aren’t the ones actually taking and managing appointments for their businesses, they have an assistant who is. While that’s a useful resource to have for this task, humans are prone to errors — especially when trying to capture someone’s contact information over the phone. (I can’t tell you how frequently I show up to appointments or reservations with my name misspelled or email written incorrectly).
Your WordPress schedule plugin, however, captures this information exactly as your users input it. So long as they don’t introduce any errors themselves, this will greatly improve the accuracy of your bookings.
So, what can you do to turn your booking widget into a digital personal assistant?
Obviously, including an intuitive form with well-labeled fields will be a huge help. But you have to think beyond that. There are things a human assistant would do, like cross-reference requested appointment times with actual availability as well as add buffer times between appointments, that improve the experience for all.
You can program the Amelia booking plugin to do the same.
For starters, create custom schedules and booking parameters for each service offering or event.
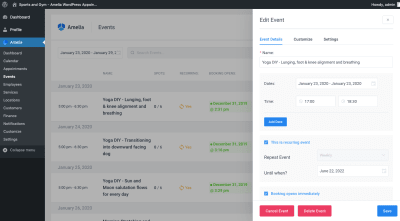
This is useful for a number of reasons.
For one, it ensures that customers only book on days and times when an appointment is available. In addition, it allows your client to control how many customers show up to events, classes, services and so on. That way, even if the 12-to-1 slot is the most popular time (because that’s when everyone’s on lunch), your client won’t get overwhelmed with appointments and be unable to serve everyone who booked at that time.
If appointments are booked with certain employees or providers, that’s another layer of complexity that should be accounted for in the design of your booking widget.
When setting up a new Employee option in Amelia, don’t just focus on the superficial stuff like who they are and which services they provide.

Set specific work hours, days off and holidays when they’re available. That way, users won’t be tempted to book their favorite provider when they aren’t around. They’ll only see the date and time options that are open.
Another thing you can do to improve the accuracy of bookings is by building buffer times around them.
Buffers give your clients and their teams time to:
- Properly set up for upcoming appointments (e.g. brushing up on a prospect or setting up a virtual conference room).
- “Clean up” after an appointment (e.g. physically cleaning up the surrounding space or capturing notes from a call).
It’s also a good idea to have buffer times in case there are overzealous prospects or customers who just want to talk and talk and talk or otherwise push the appointment over the allotted time. By having a buffer in place, it can help keep other customers’ appointments from starting late and, thus, starting the experience off on the wrong foot.
Under each Service you’ve created in Amelia, you have the option to add a buffer time before and after the time slots:

Definitely make use of this so you don’t end up creating more work or headaches for your client in the end.
Oh, and if it’s just a solo provider you’re building this appointments system for, you don’t have to set up all of these individual schedules or buffer times. You can create universal scheduling rules from the Settings tab.
4. COLLECT PAYMENTS AT THE TIME OF BOOKING
No matter how much you do to ensure that appointments can easily be booked by customers and managed by your clients, that doesn’t stop customers from flaking out on appointments.
You’re probably aware of what kind of effect this has in your business. When someone’s a no-show, you’re left sitting around waiting for them to hop onto Zoom or Skype. You give it 10 or 15 minutes before shooting off an email to reschedule and then you get back to work. Another consequence is that you’re now left with an opening that could’ve been filled by another interested prospect (and new source of revenue).
Whether your clients are booking online events or in-person appointments or classes, they experience a similar kind of time-waste and profit loss. So, to encourage more customers to actually attend their bookings, you can set up the scheduler to collect payments upfront.
The first thing to do in Amelia is to add a price to all of your services and events. Even if you don’t plan on charging upfront, this is a good idea anyway as it reminds customers what they’ll owe in the end.

To take it to the next step, enable payment collection and set up a payment processor (either Stripe or PayPal). You’ll find this under Amelia’s “Settings” and “Payments”:

When this setting is enabled, customers will automatically be taken to your payment processor after clicking the “Confirm” button on their appointment:
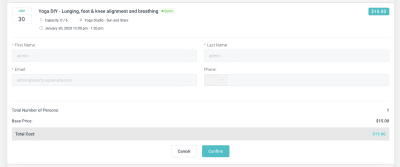
So, one thing I would advise is to include a note in the form — somewhere around the price — to let them know that payment will be collected now instead of when the service is rendered.
You could also use this for a business like your own by charging a small fee or retainer for the initial discovery call.
Another thing you can do to ensure that clients don’t lose potential revenue from missed appointments is to integrate the booking system with an external CRM or email marketing software. That way, you’ll capture users’ contact information outside of WordPress and can set up automated follow-up messages if or when they miss an appointment.
It might not help your clients recapture all of that missed business, but it’ll help restore some of it.
There are two ways to set this up. The first is using the Web Hooks Settings in Amelia:
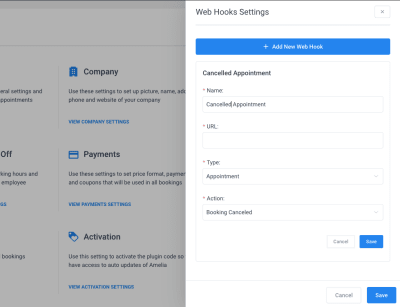
If a customer cancels, reschedules or otherwise changes their appointment, you can trigger the plugin to send that information to their third-party software. And with other automated events set up (like to invite a customer who canceled to reschedule a couple of weeks later), your client won’t have to do much to try to reconnect with the customer. Think of this as a cart abandonment feature, only for appointments.
You can also use Zapier integrations and webhooks to do the same thing.
5. AUTOMATE EMAILS AND SMS
While it’s important to try to recapture potentially lost business with follow-ups, they’re not the only customers your booking system should be in contact with. All customers matter.
As such, you should use automated emails and SMS to:
- Send a confirmation email with all the details of a booking to a customer (in addition to an .ics file that enables them to quickly add it to their personal calendar).
- Set up the same confirmation messaging for employees to notify them when they’ve been scheduled.
- Remind customers of an upcoming appointment with options to reschedule (or cancel) if they can’t make it.
- Send a “thank you” after the appointment is done. In some cases, you may invite them back for another one. In other cases (like your own), you could use this to send information on next steps.
- Email them to wish them a happy birthday, congratulate them on an anniversary or celebrate some other special day (perhaps with a goodie inside).
Bottom line: While you can certainly wow customers during a booking, you can sustain that wow for much longer by showing that it’s not just about the exchange of time and money at the time of the appointment. And that you really appreciate their business and loyalty.
With Amelia, a lot of this work is done for you already:

Common email and SMS notifications have already been created and written for you. Even better, they included personalized placeholders so messages don’t have to go out to customers sounding cold and detached.
If there are any messages not included that you want to automate, you can use your Zapier integration and third-party marketing software to handle that piece. However, what’s included here is pretty robust and covers all the bases when it comes to managing appointments.
Wrapping Up
You know how tedious and time-consuming it is having to manually manage your own appointments and events. Worse, the manual approach increases the risk of error, either losing track of the appointment altogether or not capturing details correctly and never being able to connect with the prospect as intended.
But with the help of the Amelia appointments and events WordPress booking plugin, you can automate a ton of this work. Not only that, you can elevate your booking system so that more prospects are encouraged to sign up.


